Before we begin, I would like to state that I am not in any way responsible if anything happens to your PSP. No matter what you do, there is always a chance of bricking your PSP. If you have a PSP3000, do NOT continue, as you will BRICK your PSP!!!
Step 1: Update your firmware to 5.03. It MUST be 5.03 or it won't work.
Step 2: Use ChickHen r2 to enable homebrew. Place the h.bin file directly in the the root of the memory card, and place the folder with the pictures of eggs in the PHOTO folder. To use ChickHen, just go to photos on your PSP, go into the ChickHen folder and go to the bottom image which is a .tiff image. Your PSP's screen should flash in a different color and reboot into ChickHen. If it doesn't, keep trying again and again. Turning of UMD autostart and UMD cache speeds up the process. Having no images other than the ChickHen folder also helps.
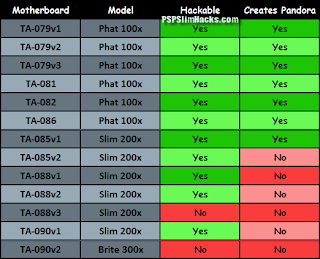
Step 3: Use PSPident to check your motherboard version. Here is a chart of which motherboards support custom firmware:

Step 4: If you are completely sure that you want to take the risk, continue to step 5.
Step 5: Use Hellcats recovery flasher to flash custom firmware onto your PSP. Remember, you need to have an OFFICIAL firmware eboot of firmware 5.00. Rename the EBOOT.PBP to 500.PBP. Then, place it in the RECOVERY folder (the one in PSP/GAME/RECOVERY, this is the folder for Hellcats recovery flasher).
Step 6: Connect your PSP to its charger, boot the Recovery Flasher, and follow the onscreen instructions.
Step 7: Congratulations! You now have a homebrew-enabled, ISO-running, themeable PSP
For more information, here is a website which you can visit.


No comments:
Post a Comment